〈〈 Getting started The S.A.R.A.H. Command Center (SCC) v.1.x.x 〉〉
Before you start, you will need:
- A micro sd card.
- An sd card adapter for the micro sd card (micro sd cards usually come with one).
- A usb sd card reader – if your compter doesn’t have an sd card slot.
- A copy of Etcher to burn images to the micro sd card.
- A Raspberry Pi with power adapter and case.
- An ethernet cat5/cat6 cable – it should be long enough to reach from the Raspberry Pi to your router or ethernet switch.
- A copy of S.A.R.A.H.
Micro sd card –
A decent high-speed micro sd card is best, and usually a 32gb card is often the least expensive compared to a 16gb or 8gb card in the same class. My thinking is that, even though you may not need 32gb of storage, you get the best performance at the best price. And, if you decide to use it for something else down the road, you’ll have a decent card that can easily be re-purposed. Here are some that fit the bill:
- SanDisk Extreme 32GB microSDHC UHS-3 Card – 100MB/s
- SanDisk Extreme PRO Plus 32GB SD Adapter up to 100 MB/s
- Samsung PRO Endurance 32GB Micro SDHC Card with Adapter – 100MB/s
- Samsung 32GB EVO Plus Class 10 Micro SDHC with Adapter 80mb/s
If you decide to look at other 32GB micro sd cards, make sure it has at least 20MB/s write speed for a Pi 3 or older (30MB/s write’s for a Pi 4) and comes with an sd card adapter – this way the card will fit in any sd card sized slot or usb reader. Anything less than that speed, will degrade your overall performance. Either way, you are only talking about a few dollars difference between models.
SD card reader –
If you don’t have one, you can find a really decent one (Sabrent SuperSpeed 2-Slot USB 3.0 Flash Card Reader – Supports SD, SDHC, SDXC, MMC/MicroSD) from Sabrent. I’ve used it wihout problems on many different computers and operating systems. You can also find other ones here
, but keep in mind that some appear as Compact flash and won’t work on some systems if you use them as a boot device.
Etcher –
Next, download and install a copy of Etcher. You will use this to burn the S.A.R.A.H. image to the micro sd card.
Raspberry Pi –
Next, you will need a Raspberry Pi 3 B+ Motherboard, power supply
and case
. Or, get the CanaKit Raspberry Pi 3 B+ kit
. Get the 3B+ at a minimum for decent performance, or a model 4 for the best performance (model 4 image will be ready for download shortly after it is available in August), but usually the latest version is the least expensive.
Ethernet cable –
You can get an cat5/cat6 ethernet cable. Make sure it will be long enough.
S.A.R.A.H. image –
After that, download the latest S.A.R.A.H. image and save it your hard drive.
With all of that assembled, let’s burn the image to the Micro SD card:
- Put the micro sd card in the sd card adapter and then place the sd card adapter into your computer’s sd card slot or any usb sd card reader you have.
- Format the micro sd card (Right-click the card in the file manager and select ‘Format’ in Windows, on Mac open the Disk Utility, highlight the card and click format. Use ‘Fat32’ as the format for either Windows or Mac.)
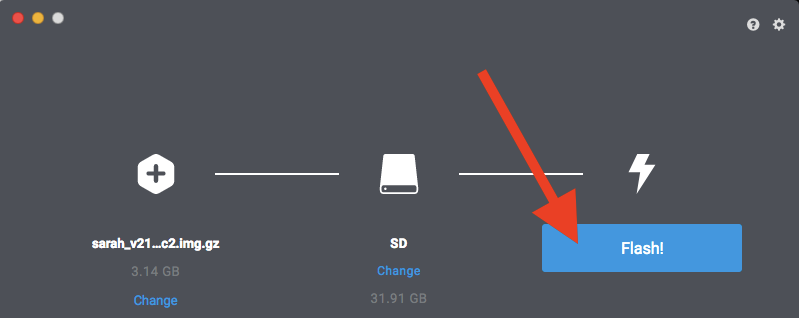
- Run Etcher.
- Select the S.A.R.A.H. image you downloaded previously.
- Select the drive the micro sd card is in.
- Click the Flash! button.
It should look like this:

Next, follow these steps to complete the installation:
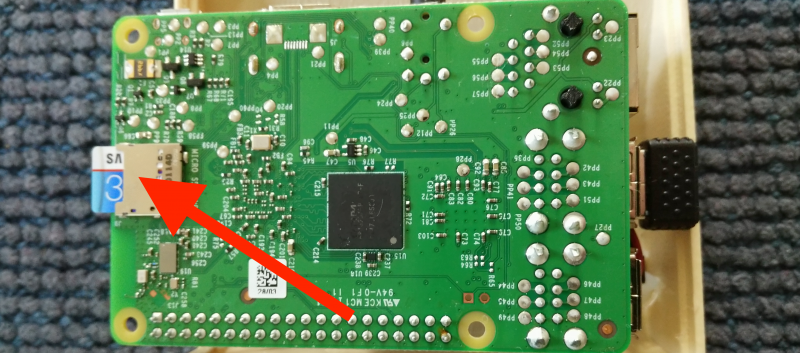
- Eject the sd card, remove the micro sd card and place it in the card slot of the Raspberry Pi – make sure the RPi is NOT plugged in yet.

- Plug the RPi into your network using your ethernet cable (make sure you do this before booting – otherwise you may get an error and will have to reboot again), plug in the power cable (turn it on if you have a switch on the power adapter). Please note that once the Pi is powered on, do NOT turn the power off by removing the power. Please see the S.A.R.A.H. Command Center (SCC) Maintenance page for instructions on how to safely turn it off.
- It will take a few minutes to initialize, during which, it will resize the sd card and reboot the RPi.
- Click this link to see if S.A.R.A.H. is up and running.
- If you are going to be typing at the console, instead of using it headlessly, make sure you run ‘raspi-config’ to set you keyboard localization. Login to the RPi, (see Accessing S.A.R.A.H.) and run the following:
$ sudo raspi-config
- Select ‘Localization Options’, then ‘Change Keyboard Layout’ and follow the prompts. Select ‘Other’, if you don’t see the option you are looking for. Feel free to set the other localizations as needed.
- The installation is now complete and you can click the next link below to continue setup.
〈〈 Getting started The S.A.R.A.H. Command Center (SCC) v.1.x.x 〉〉
Recent Topics
-
I upgraded or rebooted my RPi and now the sound doesn't work
By seeLive, 2 weeks ago
-
By seeLive, 2 weeks ago
-
Switches in BasicUI take two clicks to turn on/off
By seeLive, 4 weeks ago
-
Integrating your existing code into SARAH
By seeLive, 4 weeks ago