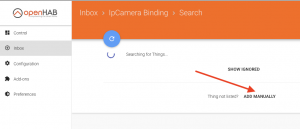
To add a new IP Camera go to the PaperUI inbox, click the blue circle with the white plus sign, then click ‘IP Camera Binding’.
Make sure you have already logged into your camera and completed the basic setup. Next, click the ‘Add Manually’ button.
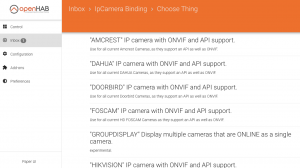
Select your type of camera. We’ll use Foscam for this example.
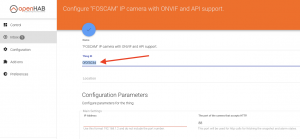
Enter the Camera ID found in the camera’s device information. It will be unique to each one.
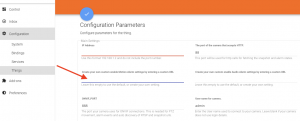
Add the following line to the ‘Create your own custom enable Motion Alarm settings by entering a custom URL’ field:
http://<ip address>:<port>/cgi-bin/CGIProxy.fcgi?cmd=setMotionDetectConfig&isEnable=1&linkage=6&snapInterval=1&sensitivity=0&triggerInterval=0&isMovAlarmEnable=1&isPirAlarmEnable=1&schedule0=281474976710655&schedule1=281474976710655&schedule2=281474976710655&schedule3=281474976710655&schedule4=281474976710655&schedule5=281474976710655&schedule6=281474976710655&area0=1023&area1=1023&area2=1023&area3=1023&area4=1023&area5=1023&area6=1023&area7=1023&area7=1023&area8=1023&area9=1023&usr=<user id>&pwd=<password>
Make sure you add your ip address, port, user id and password where noted. This line may not work for your camera. If not, please check the documentation for your specific camera.
N.B. You can test the above line by pasting it into your browser’s address bar and hitting [ENTER]. You should see a confirmation or return code of zero ‘0’, if it works correctly.
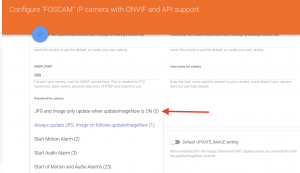
Next, click on the ‘Update the JPG and Image when:’ field and set it to ‘JPG and Image only update when updateImageNow is ON’. Then, complete the page filling in the correct IP addresses, port numbers, etc. for your camera.
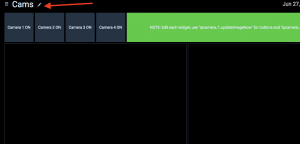
Next, go to the SCC Home Wizard, load your home template and save it again to generate the necessary code. Go to the HABPanel Cameras page, hover over the ‘Cameras’ title and click the pencil to edit the page.
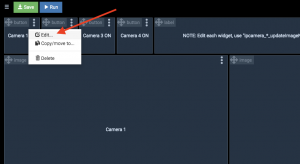
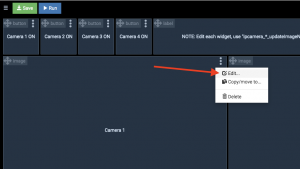
Click the ellipsis (3 vertical dots) next to the appropriate ‘Camera (n) ON’ button widget and click ‘Edit…’.
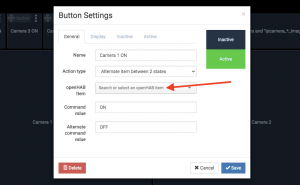
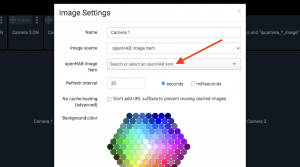
Edit the ‘openHAB Item’ to use ‘ipcamera_<camera id>_updateImageNow’ for your camera’s ID and click ‘Save’.
Click the ellipsis (3 vertical dots) next to the appropriate ‘Camera (n)’ image widget and click ‘Edit…’.
Edit the ‘openHAB Item’ to use ‘ipcamera_<camera id>_image’ for your camera’s ID and click ‘Save’.
Click the ‘Run’ button at the top left and you should be all set. Click the ‘Camera (n) ON’ button to turn on the camera’s image capture and you should see the image appear below in the ‘Camera (n)’ image widget that you just setup.
If this is not working yet, please go over the instructions again, and check the logs for errors. If you’re still having problems, post your issues in the IP Camera forum. Please include log entries as needed.
N.B. Note that turning on the ‘Away Mode’ on the openHAB Alarm page will automatically turn on the cameras alarm mode. Go to the Alarm/Tamper Alarm Systems page for setup instructions. Make sure to setup your camera’s email settings, alarm mode to save images to the appropriate storage, etc. and to be off by default.
Notes:
For more Binding info: https://community.openhab.org/t/ipcamera-new-ip-camera-binding/42771
Latest version v6/26/2020
API cameras reported as working:
(although, more are likely to work based on their similarity)
Amcrest:
IP2M-841EW
IP2M-841B
IP2M-844
IP3M-943B
IP8M-2493EW
Dahua:
IPC-HDW4631C-A
IPC-HDBW4433R-AS
IIPC-HFW4431R-Z
IPC-HDW4421E-AS
IPC-HDW2431R-ZS
DH-SD22404T-GN PTZ
DH-SD6CE225U-HNI
DH-SD1A203T-GN-S2
Foscam:
FI9831W
FI9821P
FI9900P
Fosbaby P1
C1 Lite
C1
C2
Hikvision:
DS-2CD2T46G1-4I/SL
DS-2CD2086G2-I
DS-2CD2385FWD-I
DS-2CD2042WD-I
DS-2CD2142FWD-IWS
DS-7208HUI-K2
DS-7208HQHI-F1 / N
DS-2CD2383G0-I
DS-7616NI-K2 / 16P
DS-2DE3304W-DE
Instar:
IN-8015 Full HD
IN-9008
Onvif:
Reolink RL-410
Recent Topics
-
I upgraded or rebooted my RPi and now the sound doesn't work
By seeLive, 2 weeks ago
-
By seeLive, 2 weeks ago
-
Switches in BasicUI take two clicks to turn on/off
By seeLive, 4 weeks ago
-
Integrating your existing code into SARAH
By seeLive, 4 weeks ago
