Please follow these directions for a complete working Garage door controller – all on a Raspberry Pi.
*N.B. This setup WILL work with any MQTT server, not just S.A.R.A.H. and openHAB. You will just need to change the host ip, topic and the password, in the mqttclient.py script, to match that of your server.
Complete parts list (you made not need them all):
- 5v relays to activate the garage doors
- Wire taps to connect the relays to the garage door opener switches
- 22 gauge wire also to connect the relays to the garage door opener switches
- Raspberry Pi to act a garage door conrtroller (any RPi will do as long as it has 40 pin GPIO)
- Micro sd card this is a decent, inexpensive one
- Jumper cables to connect RPi to relays
- Long range antenna needed if you have an older RPi or are a fair distance from your Wifi router
To configure the antenna, make sure power management is off. Create the following file:
$ sudo nano /etc/modprobe.d/8192cu.conf
and add these lines to it
# Disable power saving
options 8192cu rtw_power_mgnt=0 rtw_enusbss=1 rtw_ips_mode=1
save and exit with [CTRL] – o then [CTRL] – x, then reboot the RPi with:
$ sudo reboot
Instructions:
1) Download Raspberry Pi OS lite and burn the image to the micro sd card using etcher. (for more details look here)
2) Install micro sd card into RPi, and turn it on.
3) Login to the Garage door RPi with a keyboard and monitor using “pi’ as the user id and “raspberry” for the password.
4) If you need to change the hostname or change the locale, run the raspi-config util and follow the menus.
$ sudo raspi-config
5) To setup the wifi connection edit this file:
$ sudo nano /etc/wpa_supplicant/wpa_supplicant.conf
add the following lines to the bottom of the file
network={
    ssid="<your ssid>"
    psk="<your network password>"
    scan_ssid=1 (use this for hidden networks)
    key_mgmt=WPA-PSK
}
6) Now that the Garage door RPi is up and running, download the mqttclient.zip file, unzip it and put the ip address of your S.A.R.A.H. RPi, or other MQTT server, at the top of the file.
N.B. If you are using another MQTT server, you will also need to change the topic and password at the top of the python script.
7) Copy the mqttclient.py file to
/home/pi/mqttclient.py
on the Garage door RPi, using filezilla or the like.
8) To setup the file to run at boot up. Edit the following file using:
$ sudo nano /etc/rc.local
add the following line to the bottom of the file, but above “exit 0”
python3 /home/pi/mqttclient.py &
save and exit with [CTRL] – o then [CTRL] – x.
— or —
if you are using an older version of raspbian like Jessie, edit the following file:
$ nano /home/pi/.config/lxsession/LXDE-pi/autostart
add this line to bottom of the file
@python3 /home/pi/mqttclient.py &
save and exit with [CTRL] – o then [CTRL] – x.
9) To install the necessary packages, please run the following:
$ sudo apt-get update
$ sudo apt-get install mosquitto-clients
$ pip install paho-mqtt
check for rpi.gpio package
$ pip show rpi.gpio
if not installed run (nothing was returned as result of running previous command)
$ pip install rpi.gpio
10) Reboot the RPi
$ sudo reboot
11) Check the setup so far to make sure the client is running:
$ ps -ef | grep python
You should see the mqttclient.py script running, like this:
pi 834 1 0 Jun15 ? 00:01:14 python3 /home/pi/Documents/mqtt/mqttclient.py
If not, please check all the previous steps. If you still can’t get it working, please post your issues on the Garage door controller forum.
12) Shutdown the Garage door RPi with:
$ sudo shutdown -h now
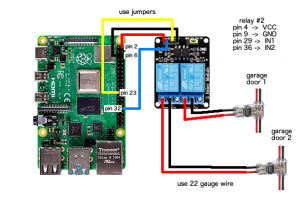
13) Wire everything together as follows, using the jumper wires to connect the RPi to the relays and the 22 gauge wire to connect the relays to the garage door opener wires. Use the T-connectors to tap into the garage door opener wires.
14) Turn on the Garage door RPi.
15) Go to the SCC Home Wizard, load (or create) your home template, add a Garage and some Garage Doors in it, and save the template. Give it a few minutes to generate all the items, etc. The best way to tell that it’s done is to watch the logs and you’ll see the Items file getting reloaded. Once that’s done, go to the Basic UI, click on Status, click on Garage Door Switches and click on one of the Garage Door switches. If everything went well your Garage doors should now open and close.
To troubleshoot the connection, login to the Garage door RPi and run this command:
$ mosquitto_sub -c -d -i sarah -h <host ip> -t home/garage -u openhab -P <password>
using the host ip from S.A.R.A.H. and the password from the top of the mqttclient.py file (remove the angle brackets as well). It should say that it has subscribed.
Go back to the Garage Door Switches in the Basic UI and click a Garage Door switch. Back on the Garage Door RPi, you should see the text message “act-1”, if you pressed switch one, “act-2”, if you pressed switch two, etc.
If you do see the messages come across, then the problem is with the Garage Door RPi. Check through all the previous steps. If you don’t see these messages, there is a problem with the mqtt setup in S.A.R.A.H. If you still can’t get it working, please post your issues on the Garage door controller forum.
Recent Topics
-
I upgraded or rebooted my RPi and now the sound doesn't work
By seeLive, 2 weeks ago
-
By seeLive, 2 weeks ago
-
Switches in BasicUI take two clicks to turn on/off
By seeLive, 4 weeks ago
-
Integrating your existing code into SARAH
By seeLive, 4 weeks ago
